As always, feel free to use the pattern to make a tree, (or three!), for yourself but please reference me as the designer. Thank you!
Oh Tiny Tannenbaum
Cascade 220, col palm
Small amount of yellow or gold colored yarn
9 small buttons
Leftover yarn scraps or polyfill stuffing
Tree is about 5 1/2” tall
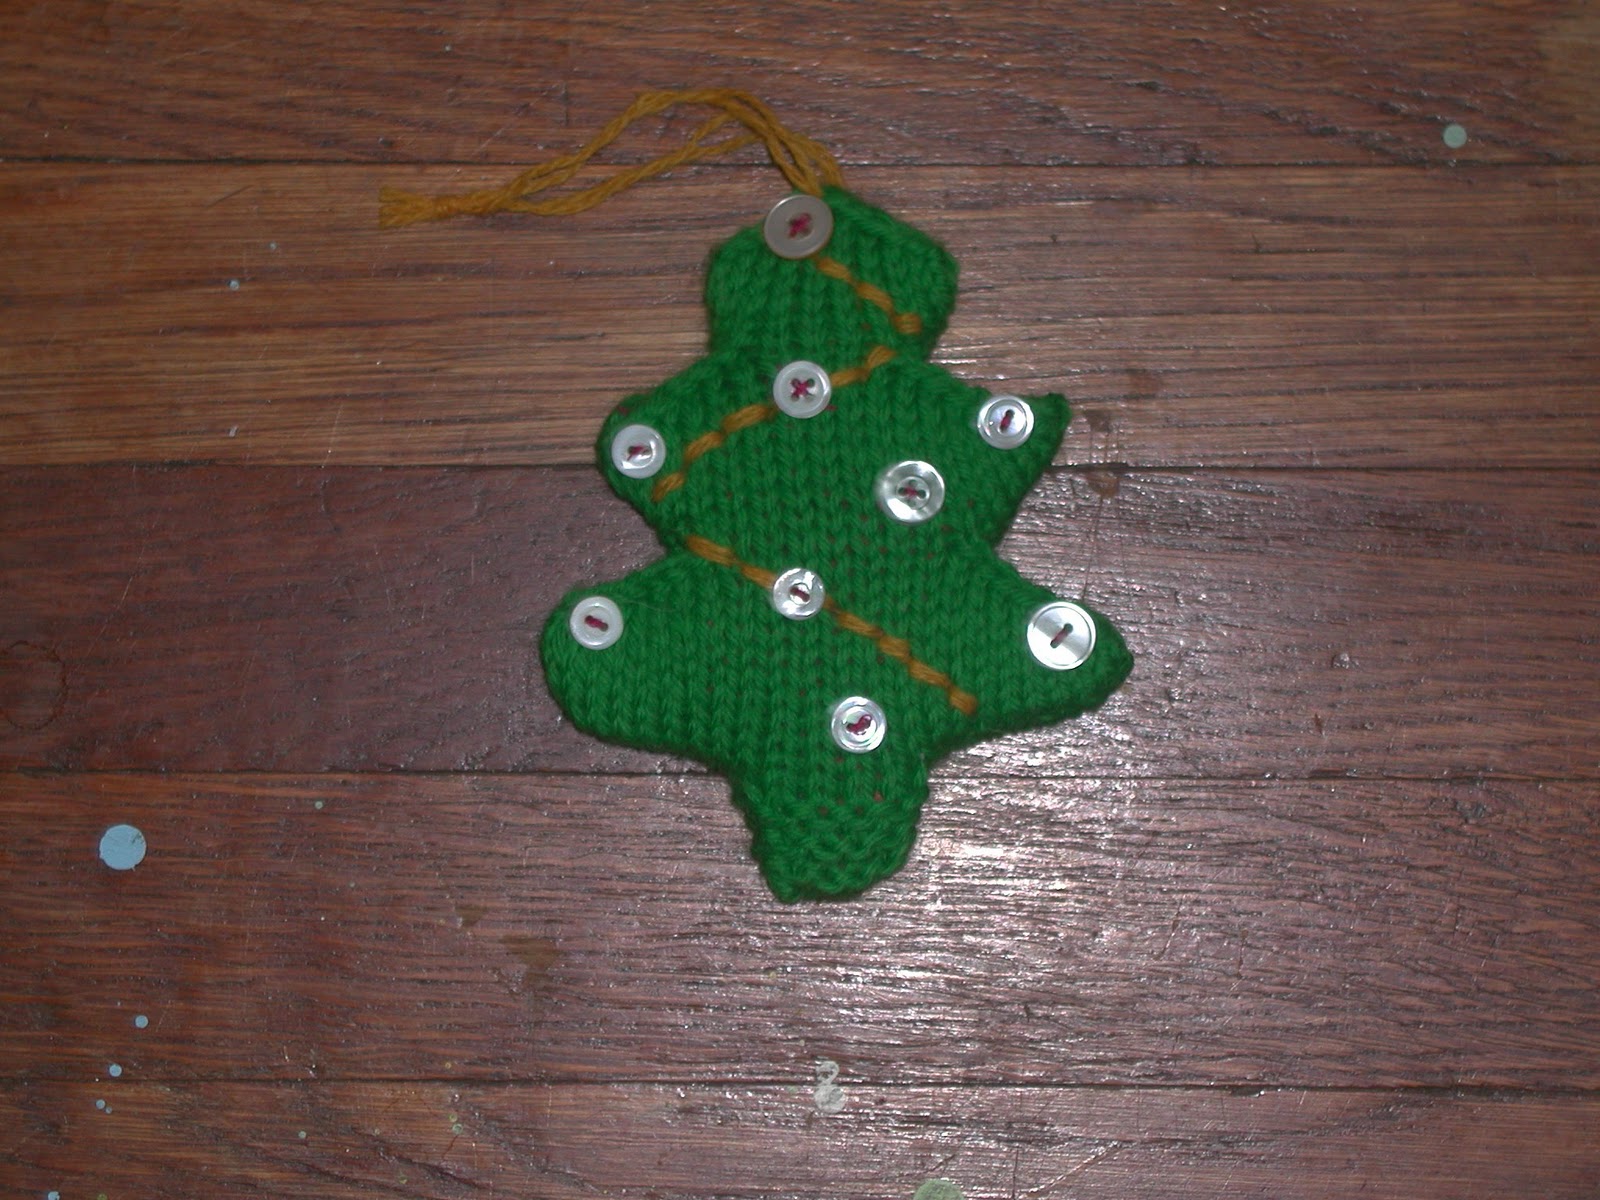
This little tree was inspired by some ornaments that I saw in a store. The ornaments themselves were very cute but very expensive so when I got home I pulled some green wool out of my stash and started playing around with shapes until I came up with this little tree. It’s a quick little knit, just a couple of hours, and uses up your leftovers. I have lots of odds and ends hanging around so I used some to stuff the tree and a bit of yellow for the garland. I raided the buttonbox for some little buttons to use as ornaments and voila! A tiny tree! The tree is small enough to be hung on a tree, used as a decoration on a package, or to hang over a doorknob. Have a happy holiday and enjoy!
Gauge-5 sts to 1”
Don’t be too concerned over the gauge. If your tree is a little bigger or smaller it’s okay.
SSK-slip 2 sts from left hand needle as to knit, place back on left hand needle and knit
K2TOG-knit 2 sts together
P2TOG-purl 2 sts together
SSP-slip 2 sts from left hand needles as to knit, place back on left hand needle and purl
SSSP-slip 3 sts from left hand needle as to knit, place back on left hand needle and purl
S1K2TOGPSSO-slip 1 st as to knit, knit the remaining 2 sts together, pass slip st over the remaining st
Cast on 7 sts
Work 7 rows in garter st
At the beginning of the next row, using the backward loop method, cast on 10 sts, purl to end
At the beginning of the next row, using the backward loop method, cast on 10 sts, knit to end
Purl 1 row
First set of decreases:
Decrease row 1: k1, ssk, knit to last 3 sts, k2tog, k1 (25 sts)
Decrease row 2: p1, p2tog, purl to last 3 sts, ssp, p1 (23 sts)
Decrease row 3: k1, ssk, knit to last 3 sts, k2tog, k1 (21 sts)
Decrease row 4: p1, p2tog, purl to last 3 sts, ssp, p1 (19 sts)
Decrease row 5: k1, ssk, knit to last 3 sts, k2tog, k1 (17 sts)
Decrease row 6: p1, p2tog, purl to last 3 sts, ssp, p1 (15 sts)
Decrease row 7: k1, ssk, knit to last 3 sts, k2tog, k1 (13 sts)
Decrease row 8: p1, p2tog, purl to last 3 sts, ssp, p1 (11 sts)
Increase row: (RS) using the backward loop method, cast on 6 sts st beginning of row, knit to end (17 sts)
Increase row: (WS) using the backward loop method, cast on 6 sts at the beginning of row, purl to end (23 sts)
Second set of decreases:
Decrease row 1: k1, ssk, knit to last 3 sts, k2tog, k1 (21 sts)
Decrease row 2: p1, p2tog, purl to last 3 sts, ssp, p1 (19 sts)
Decrease row 3: k1, ssk, knit to last 3 sts, k2tog, k1 (17 sts)
Decrease row 4: p1, p2tog, purl to last 3 sts, ssp, p1 (15 sts)
Decrease row 5: k1, ssk, knit to last 3 sts, k2tog, k1 (13 sts)
Decrease row 6: p1, p2tog, purl to last 3 sts, ssp, p1 (11 sts)
Decrease row 7: k1, ssk, knit to last 3 sts, k2tog, k1 (9 sts)
Decrease row 8: p1, p2tog, purl to last 3 sts, ssp, p1 (7 sts)
Increase row: (RS) using the backward loop method, cast on 4 sts at beginning of row, knit to end (11 sts)
Increase row: (WS) using the backward loop method, cast on 4 sts at the beginning of row, purl to end (15 sts)
Third set of decreases:
Decrease row 1: k1, ssk, knit to last 3 sts, k2tog, k1 (13 sts)
Decrease row 2: p1, p2tog, purl to last 3 sts, p2tog, p1 (11 sts)
Decrease row 3: k1, ssk, knit to last 3 sts, k2tog, k1 (9 sts)
Decrease row 4: p1, p2tog, purl to last 3 sts, ssp, p1 (7 sts)
Decrease row 5: k1, ssk, knit to last 3 sts, k2tog, k1 (5 sts)
Decrease row 6: p1, sssp, p1 (3 sts)
Decrease row 7: s1k2togpsso
Cut a 10” tail and pull through remaining st
Repeat for second side

Beginning at top of tree, and using one of the tails left from bind off, sew around tree halfway. Starting at top of tree, with other tail left from bind off, sew around other side of tree, stopping about 2” away from where you left off with the other tail. Using leftover yarn scraps, or polyfill stuffing, stuff tree until it is about 1” thick. Use one of the yarn tails to sew up opening.
With a darning needle and leftover yellow/gold yarn sew a garland onto tree. I made a zigzag on both sides but feel free to sew whatever garland you prefer onto your tree. Sew buttons on for ornaments. Enjoy!
 |
| The perfect tree for me! |
Cute! Thanks for sharing this. I'm your newest follower.
ReplyDeleteXoXoXo
Joy
Thank you Joy! Welcome to the blog!
ReplyDelete