Tuesday, December 28, 2010
Hope you all got some great knitting related gifts for the holidays, I certainly did. Two of my friends got me a gift certificate to Twisted, http://twistedpdx.com/, and I spent Monday picking out some great yarn. (Look for a really colorful sweater coming soon!) I think I'm also going to tackle the Twinkie Chan cupcake scarf as a belated holiday pattern for myself. It's so sweet and cute I'm sure I'll be smiling all the time when wearing it!
Monday, December 27, 2010
Pattern #9
I love all girly things, but I especially love bows. There's something so charming about them! I started looking around and there just aren't too many patterns for them. So I sat down after the craziness of the holidays and whipped one up. It gives you a chance to get comfortable with short rows, (one of my other favorite things), and it makes up in almost no time. Once it's done, use a glue gun to glue it onto a headband or a hair clip. It can also be sewn onto a sweater or t shirt.
It's best to use a natural fiber for this project as you press it with a hot iron to set the shape once you're done. You don't have to do the last step if you are using an acrylic or other synthetic yarn, but with wool I did. I hope you enjoy this little accessory!
As usual I have the copyright to my work. Please feel free to use the pattern to make something for yourself but please reference me as the designer. Thank you for visiting my blog and I hope you have a wonderful day!

Tie One On
Small amount of dk weight yarn
(I used some leftover bits of Classic Elite’s Princess)
Size 3 needles
Bow measures approximately 5"
Gauge is not necessary for this project
I love girly accessories, especially bows. (Well, maybe not those giant hair bows that everyone is wearing right now.) This little bow is small enough to glue onto a hair clip, or onto a plain headband. Make sure to use a natural material, such as wool or cotton, as you are going to press the bow with a hot iron.
Cast on 24 sts
Work 4 rows in garter st
Begin short rows for right side:
Row 1: knit 11, w&t
Row 2: knit
Row 3: knit 10, w&t
Row 4: knit
Row 5: knit 9, w&t
Row 6: knit
Row 7: knit 8, w&t
Row 8: knit
Row 9: knit 7, w&t
Row 10: knit
Knit to end of row, working wraps together with their stitches
Begin short rows for left side:
Row 1: knit 11, w&t
Row 2: knit
Row 3: knit 10, w&t
Row 4: knit
Row 5: knit 9, w&t
Row 6: knit
Row 7: knit 8, w&t
Row 8: knit
Row 9: knit 9, w&t
Row 10: knit
Knit 1 row, working wraps together with their stitches
Repeat short rows 1-10 for right side
Knit 1 row, working wraps together with their stitches
Repeat short rows 1-10 for left side
Knit 1 row, working wraps together with their stitches
Next row: bind off
Press bow with iron, making sure the setting is on high. I used the steam function for my bow. (I know this is counter to what you normally do with knitted garments but it works for this bow. The steam helps to set the shape.)
Using size E crochet hook chain 11
Working into the second chain, sc, then sc to end
Work one more row of scs
Wrap small crochet chain around middle of bow, sew ends together
Weave in ends
Wear and enjoy!
Wear and enjoy!

Sunday, December 26, 2010
Leftovers?
I hope everyone had a great holiday! Along with a great holiday there's a great holiday dinner. So what do you do with the leftovers if you had turkey? Here's a recipe I came up with a few years ago when I was trying to figure out what to do with leftover chicken. I've gotten so many compliments that I thought I would share it with you!
Turkey/Chicken Curry Salad
This is a great way to use up your leftovers. There are just a few ingredients and I bet you have most of them in your pantry right now. This salad is great as a light lunch with tomatoes and crackers, or on a sandwich. The tartness of the apple is a great contrast to the sweetness and spice of the curry.
Leftover turkey or chicken
1 tart green apple, I usually use Pippins
1 yellow onion
Curry powder to taste (I get mine from the bulk spice aisle at Whole Foods)
Pinch of salt
Mayonnaise or Heinz Salad Cream to taste (available at Cost Plus in the States. It's like the British version of Miracle Whip and is a bit more vinegary which is why I like it.)
Cut turkey or chicken into cubes. Cut both apple and onion into pieces about the same size as the poultry. Place in bowl with turkey/chicken and add as much curry as you like. Add in salt, then add half as much mayonnaise as you like. Stir well, taste, then add more curry, salt, or mayonnaise. (I have found when making this salad that sometimes you don't need as much of the condiments as you think you might.) Enjoy!
Saturday, December 25, 2010
Bonus Pattern!
Here's a little christmas surprise, a bonus pattern. I was knitting up a present for one of my friends when I realized that I didn't have anything planned for her partner. Luckily I have a yarn store nearby, http://www.knit-purl.com/store/pc/home.asp, which carries a good selection of Cascade 220. I found a great dark red, and started trying to figure out what to make. Not everyone likes arm warmers but I figured everyone needs a hat here in rainy Portland. I had made my friend a Cloche Call and thought that if I modified it the basic idea would make a great men's hat. I omitted the button, made the garter band a bit thinner, and gave the whole thing a closer fit. If you've made the Cloche Call, why not make a partner for your partner?
Hope you all have a great holiday, and thank you to those who are following the blog, it gives me a lot of encouragement to see that people are coming here and viewing the patterns. I always welcome suggestions and comments, and if you want to share, send me your pictures, I love to see what people do with the patterns! As always, the patterns are for personal use, and please reference me as the designer when using them.


Hope you all have a great holiday, and thank you to those who are following the blog, it gives me a lot of encouragement to see that people are coming here and viewing the patterns. I always welcome suggestions and comments, and if you want to share, send me your pictures, I love to see what people do with the patterns! As always, the patterns are for personal use, and please reference me as the designer when using them.
It’s Not a Cloche Call At All
2 double point needles, size 8
1 16” circular needle, size 6
Darning needle
1 ball Cascade 220 Superwash, color 855, maroon
Gauge: 4.5 sts to 1”
Here’s a simple men’s hat that I came up with when finishing a Cloche Call as a present for one of my friends. I was stumped as to what to knit for her partner until I came up with the idea of modifying the Cloche Call hat for men. I omitted the side button and sewed the band together, still picking up and knitting in the round for the rest of the hat. It’s a fast and easy knit just like the Cloche Call, perfect for making up as a last minute gift.

Cast on 10 sts with size 8 dpns, you will only need two for the band. Work back and forth on them as you would with any straight needles.
Work in garter stitch for 20”, bind off, leaving last st on needles
Using smaller circular needles and starting at stitch left over from bind off, and counting that stitch as the first, pick up 100 sts around top of band
Join and purl one round, marking beginning of round with a marker
Work in st st until piece measures 5”
Decrease row 1: ssk, knit 18, repeat 4 more times
Knit 1 round
Decrease row 2: ssk, knit 17, repeat 4 more times
Knit 1 round
Decrease row 3: ssk, knit 16, repeat 4 more times
Knit 1 round
Decrease row 4: ssk, knit 15, repeat 4 more times
Knit 1 round
Decrease row 5: ssk, knit 14, repeat 4 more times
Decrease row 6: ssk, knit 13, repeat 4 more times
Decrease row 6: ssk, knit 12, repeat 4 more times
Decrease row 7: ssk, knit 11, repeat 4 more times
Decrease row 8: ssk, knit 10, repeat 4 more times
Decrease row 7: ssk, knit 9, repeat 4 more times
Decrease row 8: ssk, knit 8, repeat 4 more times
Decrease row 9: ssk, knit 7, repeat 4 more times
Decrease row 10: ssk, knit 6, repeat 4 more times
Decrease row 11: ssk, knit 5, repeat 4 more times
Decrease row 12: ssk, knit 4, repeat 4 more times
Decrease row 13: ssk, knit 3, repeat 4 more times
Decrease row 14: ssk, knit 2, repeat 4 more times
Decrease row 15: ssk, knit 1, repeat 4 more times
Decrease row 16: ssk across round
Cut yarn, leaving a tail about 9”
Thread tail onto darning needle and pull through remaining 5 sts
Sew garter stitch band ends together
Weave in ends
Wear and enjoy!

Thursday, December 23, 2010
Wednesday, December 22, 2010
Knit Night at Yarn Garden
I went to last night's knit night at Yarn Garden, http://yarngarden.net/, and immediately remembered why I loved going to their knit nights on Tuesday. Everyone there is at Yarn Garden is so nice, and the knitters that show up are so much fun it's hard to leave. (But I had to because I take the bus and my transfer was going to expire.) Thanks to everyone who complimented me on my cloche, I hope you all enjoy the pattern! And thanks to Yarn Garden for supplying the wonderful treats! Trust that there will be no more hiatus from this knit night for me!
Monday, December 20, 2010
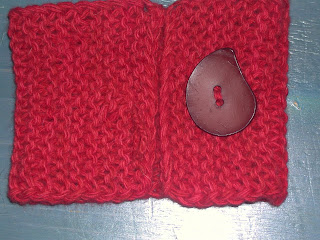
Easy Peasy Neck Piece
Here's pattern #8, a quick and easy little knit just in time for the holidays. It's perfect for beginners and only takes a few hours to knit. If you are stumped for a last minute gift this should surely fit the bill!
If you finish any of these patterns and feel like sharing feel free to send photos here and I will post them, it's always great to see what people are doing with the patterns! Thank you to the followers of this blog, it's good to know there are people out there reading this! I'm always open to suggestions too, so if you have questions, or there is something you want to suggest, please feel free to do so. (Just no alpaca or metal, I am, unfortunately, allergic to both of those!) I am trying to use yarns that are affordable in the patterns for this blog, as I'm sure it's not just me on a budget.
As usual, feel free to use the patterns here but please remember to reference me as the designer.
Easy Peasy Neck Piece
Malabrigo Lace. col. Pagoda
Size 10.5 needles
Size E crochet hook
1 button
Finished piece measures 14” long and 4.5" wide
Gauge: 3.5 sts to 1” holding 4 strands of yarn together
Before making the scarf divide ball into two equal size balls. Use the ends from the outside of each ball, you are holding four strands of yarn in your hand. (If you do not have a ball winder at home ask if your LYS can wind the yarn for you into two equal size balls.)
Sometimes there’s a bit of yarn left over and you don’t want to throw it out but you’re not sure what to do with it. When there’s not enough left for a full sized scarf or gloves there’s always this little pattern. Or, if you’re like me, and have an allergy to metal, this little neck piece gives you a chance to be stylish. It fits comfortably around your neck and keeps you warm without the bulk of a scarf or cowl.

Cast on 16 sts
Work in garter st for 14”
Bind off
Using crochet hook and only TWO strands of yarn chain 15, break yarn leaving a 4” tail, and pull through last stitch.
Sew button on opposite side of neck piece, 3 garter ridges in from cast on.
Wear and enjoy!
Hope you all have a Happy Holidays!
Monday, December 13, 2010
Oh Tiny Tree
Here's pattern #7, just in time for the holidays! It's a tiny tree that I came up with after looking at some pretty, but very expensive knitted ornaments. It's hard to believe that this is the second month of this project, it feels like it's been going so fast. (Bet I won't be saying that on week 40!) Use this little tree as an ornament, a decoration on a package, or just as a present on it's own. It's a fun way to use up all those odds and ends hanging around your stash!
As always, feel free to use the pattern to make a tree, (or three!), for yourself but please reference me as the designer. Thank you!


As always, feel free to use the pattern to make a tree, (or three!), for yourself but please reference me as the designer. Thank you!
Oh Tiny Tannenbaum
Cascade 220, col palm
Small amount of yellow or gold colored yarn
9 small buttons
Leftover yarn scraps or polyfill stuffing
Tree is about 5 1/2” tall
This little tree was inspired by some ornaments that I saw in a store. The ornaments themselves were very cute but very expensive so when I got home I pulled some green wool out of my stash and started playing around with shapes until I came up with this little tree. It’s a quick little knit, just a couple of hours, and uses up your leftovers. I have lots of odds and ends hanging around so I used some to stuff the tree and a bit of yellow for the garland. I raided the buttonbox for some little buttons to use as ornaments and voila! A tiny tree! The tree is small enough to be hung on a tree, used as a decoration on a package, or to hang over a doorknob. Have a happy holiday and enjoy!
Gauge-5 sts to 1”
Don’t be too concerned over the gauge. If your tree is a little bigger or smaller it’s okay.
SSK-slip 2 sts from left hand needle as to knit, place back on left hand needle and knit
K2TOG-knit 2 sts together
P2TOG-purl 2 sts together
SSP-slip 2 sts from left hand needles as to knit, place back on left hand needle and purl
SSSP-slip 3 sts from left hand needle as to knit, place back on left hand needle and purl
S1K2TOGPSSO-slip 1 st as to knit, knit the remaining 2 sts together, pass slip st over the remaining st

Cast on 7 sts
Work 7 rows in garter st
At the beginning of the next row, using the backward loop method, cast on 10 sts, purl to end
At the beginning of the next row, using the backward loop method, cast on 10 sts, knit to end
Purl 1 row
First set of decreases:
Decrease row 1: k1, ssk, knit to last 3 sts, k2tog, k1 (25 sts)
Decrease row 2: p1, p2tog, purl to last 3 sts, ssp, p1 (23 sts)
Decrease row 3: k1, ssk, knit to last 3 sts, k2tog, k1 (21 sts)
Decrease row 4: p1, p2tog, purl to last 3 sts, ssp, p1 (19 sts)
Decrease row 5: k1, ssk, knit to last 3 sts, k2tog, k1 (17 sts)
Decrease row 6: p1, p2tog, purl to last 3 sts, ssp, p1 (15 sts)
Decrease row 7: k1, ssk, knit to last 3 sts, k2tog, k1 (13 sts)
Decrease row 8: p1, p2tog, purl to last 3 sts, ssp, p1 (11 sts)
Increase row: (RS) using the backward loop method, cast on 6 sts st beginning of row, knit to end (17 sts)
Increase row: (WS) using the backward loop method, cast on 6 sts at the beginning of row, purl to end (23 sts)
Second set of decreases:
Decrease row 1: k1, ssk, knit to last 3 sts, k2tog, k1 (21 sts)
Decrease row 2: p1, p2tog, purl to last 3 sts, ssp, p1 (19 sts)
Decrease row 3: k1, ssk, knit to last 3 sts, k2tog, k1 (17 sts)
Decrease row 4: p1, p2tog, purl to last 3 sts, ssp, p1 (15 sts)
Decrease row 5: k1, ssk, knit to last 3 sts, k2tog, k1 (13 sts)
Decrease row 6: p1, p2tog, purl to last 3 sts, ssp, p1 (11 sts)
Decrease row 7: k1, ssk, knit to last 3 sts, k2tog, k1 (9 sts)
Decrease row 8: p1, p2tog, purl to last 3 sts, ssp, p1 (7 sts)
Increase row: (RS) using the backward loop method, cast on 4 sts at beginning of row, knit to end (11 sts)
Increase row: (WS) using the backward loop method, cast on 4 sts at the beginning of row, purl to end (15 sts)
Third set of decreases:
Decrease row 1: k1, ssk, knit to last 3 sts, k2tog, k1 (13 sts)
Decrease row 2: p1, p2tog, purl to last 3 sts, p2tog, p1 (11 sts)
Decrease row 3: k1, ssk, knit to last 3 sts, k2tog, k1 (9 sts)
Decrease row 4: p1, p2tog, purl to last 3 sts, ssp, p1 (7 sts)
Decrease row 5: k1, ssk, knit to last 3 sts, k2tog, k1 (5 sts)
Decrease row 6: p1, sssp, p1 (3 sts)
Decrease row 7: s1k2togpsso
Cut a 10” tail and pull through remaining st
Repeat for second side

Beginning at top of tree, and using one of the tails left from bind off, sew around tree halfway. Starting at top of tree, with other tail left from bind off, sew around other side of tree, stopping about 2” away from where you left off with the other tail. Using leftover yarn scraps, or polyfill stuffing, stuff tree until it is about 1” thick. Use one of the yarn tails to sew up opening.
With a darning needle and leftover yellow/gold yarn sew a garland onto tree. I made a zigzag on both sides but feel free to sew whatever garland you prefer onto your tree. Sew buttons on for ornaments. Enjoy!
 |
| The perfect tree for me! |
Saturday, December 11, 2010
Twisted and Twinkie Chan Workshop
Last night Portland yarn store Twisted, http://twistedpdx.com/, had a workshop with crocheter Twinkie Chan. She makes wonderful scarves, hats, hand warmers and more, all food themed. (Find her website here: http://www.twinkiechan.com/) I'm not the best crocheter but I had so much fun making a crocheted cupcake I'm going to attempt to make the scarf. (I think it might be a great way to use up some of the odds and ends in my stash.) Twisted has, in addition to a wonderful selection of yarn, a great selection of teas. The staff were great, offering us tea and real, edible cupcakes during the class! So much fun! Thanks to Twisted and Twinkie Chan!
Monday, December 6, 2010
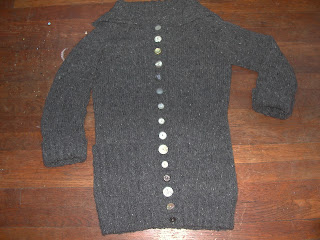
Pattern #6, a Cozy Cardigan
Here's pattern #6, a warm and cozy cardigan. It's been perfect for the wintry Portland weather, made from Rowanspun Aran, a soft and sturdy yarn. Unfortunately I bought this yarn several years ago and have had it sitting in my stash waiting for the perfect project, and while it was doing that it was discontinued by the company. A good alternative would Malabrigo Worsted, it has the same yardage and is soooooo soft. I hope you enjoy this one, it's one of my favourites, with 3/4 length sleeves and once again knitted from the top down for easy finishing. For the buttons I went to my collection of vintage buttons and used 15 of them on the button band to give this cardigan an eclectic feel. Using all the same kind of button would give this cardigan a more modern feel.
As usual, feel free to use the pattern to make yourself a cardigan but please remember to reference me as the designer. Thank you!


As usual, feel free to use the pattern to make yourself a cardigan but please remember to reference me as the designer. Thank you!
Mistake Rib Cardigan Version 2.0
5 skeins Rowanspun Aran (Unfortunately this yarn is now discontinued. A good substitute would be Malabrigo Worsted which has the same amount of yardage. Adjust your needle size to get the correct stitch gauge.)
size 7 24” circulars
size 5 24” circulars
4 stitch markers in colour A, 2 stitch markers in colour B
15 buttons, 1” to 1 1/2” in size ( I used vintage buttons I had in my button box for an eclectic look)
36” around and 28” long
Gauge: 4.5 sts to 1"
Mistake Rib:
(Worked over an uneven number of sts)
Row 1: K2, p2 to last 3 sts, k2, p1
Row 2: k2, p2, to last 3 sts, k2, p1
Repeat these two rows for ribbing
This ribbing looks very odd for the first few rows. If you would like a visual guide for this stitch there's a great one here: http://www.wikihow.com/Knit-the-Mistake-Rib-Pattern.

I had some lovely grey tweed yarn from Rowan sitting in my stash and had, for years, been trying to figure out what to do with it. During the summer I had knit a shorter version of this cardigan in Noro Kureyon and thought that a longer version in this tweedy wool would be perfect for Portland’s changeable fall and winter weather. I changed the width of the front bands so I could have larger buttons and added a patch pocket for those days when you don’t want or need to carry a purse.
The neck of this cardigan is shaped with short row shaping so the collar will lay flat. This is a top down cardigan, and you will be increasing during the short row shaping so be sure and read through the pattern before beginning the cardigan to familiarize yourself with what you will be doing.
Body: cast on 16 sts, pm, cast on 8 sts, pm, cast on 38 sts, pm, cast on 8 sts, pm, cast on 16 sts, pm
purl 1 row
Begin short row shaping:
row 1: knit across 59 sts, w & t
row 2: purl across 35 sts, w & t
row 3: knit across 38 sts, w & t
row 4: purl across 40 sts, w & t
row 5: knit 2, kfb, sm, kfb, knit across 36 sts, kfb, sm, kfb, knit 1, w & t
row 6: purl across 49 sts, w & t
row 7: knit 4 sts, kfb, sm, kfb, knit across 38 sts, kfb, sm, kfb, knit 3 sts, w & t
row 8: purl across 54 sts, w & t
row 9: knit 6, kfb, sm, kfb, knit across 40 sts, kfb, sm, kfb, knit to end
row 10: purl to end
row 11: knit across 15 sts, kfb, sm, kfb, knit 9, kfb, sm, kfb, knit across 42 sts, kfb,sm, kfb, knit across 9 sts, kfb, kfb, knit to end

row 12: purl
This ends the short row shaping for the cardigan. From here on you will increase before and after the markers as normal by knitting the front and back of each st. All wrong side rows will be purled.
row 13: knit to 1st marker, kfb, sm, kfb, repeat 3 more times, knit to end
row 14: purl
Repeat these two rows until there will be 34 sts for each front, 45 sts for each sleeve, and 80 sts for back
Divide for body and sleeves:
knit across front sts, remove markers, place 43 sleeve sts on scrap yarn, sm, knit across back sts, remove marker, place 43 sleeve sts on scrap yarn, sm, knit to end
(144 sts left on needles)
Body:
*please note all waist shaping for this cardigan will take place at back darts
Starting with a purl row, work 3 rows in st st
Set up row for back darts: knit across front to side markers, sm, knit 15 sts, pm, knit across 50 sts, pm, knit to end
purl 1 row
Decrease row: knit to 1st back dart marker, sm, ssk, knit to 2 sts before 2nd dart marker, k2tog, knit to end
row 2: purl
row 3: knit
row 4: purl
Repeat these 4 rows 9 more times (124 sts left)
work 10 rows in st st
Increase row: knit to 1st back dart marker, sm, k1, m1, knit to 1 st before 2nd back dart marker, k1, m1, sm, knit to end
row 2: purl
row 3: knit
row 4: purl
Repeat these 4 rows 8 more times, ending with a RS row
Purl 1 row
Knit 1 row
Purl 1 row
Knit to 1st back dart marker, sm, k1, m1, k21, m1, k21, m1, k1, sm, knit to end, (145 sts)
Change to smaller needles
Begin Mistake Rib
WS: p2, k2, to last st, p1
RS: k2, p2, to last st, k1
Repeat these two rows until ribbing measures 4”
Bind off
Sleeves:
Transfer 43 sts from scrap yarn to larger size needles
Work in st st for 16”, end with a RS row
Change to smaller needles and begin Mistake Rib
WS: p2, k2, to last st, k1
RS: p2, k2, to last st, k1
Repeat these 2 rows until ribbing measures 1”, place removable marker or scrap yarn to mark last row
Work 4” more in Mistake Rib
Bind off
Sew up sleeve seam
Fold rib at 1” marker
Tack down in several equally spaced intervals at bind-off edge so that it will stay put when wearing.
Repeat for second sleeve

Pocket:
Using smaller needles cast on 29 sts
Work in mistake rib until pocket measures 6"
Bind off
Sew onto garment, lining ribs on pocket up with the ribs on ribbing (pin pocket in place while doing this)
Buttonhole band:
With right side of garment facing you, pick up 119 sts along the right hand side edge
Work 7 rows in Mistake Rib as follows:
WS: p2, k2, work to last st, k1
RS: repeat WS row
Place buttonholes: (row 8), work 4 sts in pattern, yo, k2tog, (work 7 sts in pattern, yo, k2tog) repeat 13 more times, work last 2 sts in pattern
Work 5 more rows in Mistake Rib
Bind off
Buttonband:
With right side of the garment facing you, pick up 119 sts along left hand side edge
Work 13 rows in Mistake Rib as follows:
WS: p2, k2, to last st, k1
RS: repeat WS row
Bind off
Place buttons to correspond to buttonholes
Wear and enjoy!
 |
| Pocket is placed so the ribs on it correspond to the ribs on ribbing |
Subscribe to:
Posts (Atom)