Saturday, January 22, 2011
Monday's Pattern........
There was an unexpected turn of events this weekend and the apartment I will be moving to is ready for me even though I wasn't ready yet with all my packing. Also my move in date was set as the 20th, the day I found out so I'm scrambling to get everything moved this weekend. Needless to say the cat and fish aren't too happy about all the commotion! (Mr. Catch caught on that something was up so I took him down the hall to see the new apartment. I think he'll like it, the apartment is on a corner so we have four windows for him to look out rather than two.) Luckily for me the apartment is on the same floor as mine making this one of the easiest moves I've ever done. Please bear with me, with all the moving and work this Monday's pattern will probably show up on Tuesday. Thanks to all for understanding!
Tuesday, January 18, 2011
Better Late Than Never!
Pattern #12 is, unfortunately, showing up a bit late this week. I started a new job on the 10th and it's been a whirlwind for the last two weeks! (Don't think I'm complaining, I'm thrilled about the job and the great people that I work with!) My time for knitting has been fairly limited but I came up with this pattern and I hope you enjoy it. I got requests for another crocheted item and I hope this scarf makes the crocheters happy. It gently curves around your neck for easy wearing because of it's construction, and since it's made in small pieces that are sewn together, it's easily portable. I called it Bubbles because the colors reminded me of the iridescence of soap bubbles on a sunny day.


Bubbles

1 ball Skacel Crazycolor sock yarn
Size E crochet hook
hdc-half double crochet
sc-single crochet
Gauge is not necessary for this project
Sometimes you find a great yarn but aren’t quite sure what to do with it. I saw this Skacel sock yarn in one of my LYS and loved the combination of colors but I don’t like to knit socks. It thought about making another entrelac scarf but wasn’t really in the mood for that. I like to try out new ways of making ordinary items and so I came up with a series of octagons, sewn onto one another, that would curve slightly when finished. This curve helps the scarf sit on easily on the neck when worn. The plus is that as a sock yarn it’s easily washable!
Chain 4, join chain with slip st to form a circle
Sc, then work 7 scs into circle
Next round: work a hdc into each sc twice (14 hdcs)
The two hdcs will form a “V”. All increases will be worked into these Vs.
Round 1: work two hdcs into next st, work one hdc into next st, repeat 6 more times
Round 2: work two hdcs into next st, work one hdc into next 2 sts, repeat 6 more times
Round 3: work two hdcs into next st, work one hdc into next 3 sts, repeat 6 more times
Round 4: work two hdcs into next st, work one hdc into next 4 sts, repeat 6 more times
Round 5: work two hdcs into next st, work one hdc into next 5 sts, repeat 6 more times
Round 6: work two hdcs into next st, work one hdc into next 6 sts, repeat 6 more times
Round 7: work two hdcs into next st, work one hdc into next 7 sts, repeat 6 more times
Round 8: work two hdcs into next st, work one hdc into next 6 sts, repeat 6 more times
Work a slip st into next st and fasten off
Make 13 more of the octagons
I decided to graduate the colors in my scarf but feel free to put them together in any combination. Sew one of the eight sides from point to point, then move to the opposite side of the octagon and sew the next octagon onto it in the same manner until they are all joined.
Sew in ends
Wear and enjoy!

Monday, January 10, 2011
Pattern #11!
I can't believe that it's been almost twelve weeks of patterns. Three months is one quarter of the way to a year! It's a great feeling to have stuck with this so far, here's hoping that I make it the entire way!
Sorry that this is another accessory but this past week has been really busy in a good way. I finally, after a year and a half of looking, have gotten a job. And a full time one too!
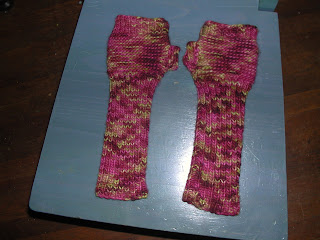
I came up with these gloves because I have a trench coat I love but for one problem. It has 3/4 length sleeves, and with the winter weather here in Portland, that's not always a good thing. These gloves are long enough to keep me warm and cozy during a cold day but cute enough to be worn anytime. Once again I used Malabrigo Worsted, so soft and lovely I don't really mind using it over and over. This color I got at http://www.knit-purl.com/store/pc/home.asp, a yarn store fairly close to me. If you're downtown it's worth going over not only for the great selection of yarn but for their wonderful window displays. Hope you enjoy the gloves!
As always, the patterns are for you to use to make yourself something but please remember to reference me as the designer. Thank you!

Sorry that this is another accessory but this past week has been really busy in a good way. I finally, after a year and a half of looking, have gotten a job. And a full time one too!
I came up with these gloves because I have a trench coat I love but for one problem. It has 3/4 length sleeves, and with the winter weather here in Portland, that's not always a good thing. These gloves are long enough to keep me warm and cozy during a cold day but cute enough to be worn anytime. Once again I used Malabrigo Worsted, so soft and lovely I don't really mind using it over and over. This color I got at http://www.knit-purl.com/store/pc/home.asp, a yarn store fairly close to me. If you're downtown it's worth going over not only for the great selection of yarn but for their wonderful window displays. Hope you enjoy the gloves!
As always, the patterns are for you to use to make yourself something but please remember to reference me as the designer. Thank you!

Baby, It’s Cold Outside Gloves
1 skein Malabrigo Merino Worsted, color Col China
1 pair size 7 needles
1 pair size 6 needles
1 size E crochet hook
Darning needle
Gauge: 4.5 sts to 1” in stockinette stitch
Garter Stitch:
Row 1: knit
Row 2: knit
Repeat these two rows
sl1-slip the next stitch as to purl
sc-single crochet
Sometimes you find a great colorway, in a great yarn, and you’re dying to make something with it, but you know a whole sweater in it would be overkill. That was how I felt about this lovely colorway from Malabrigo. It’s a green and pink mix that might be too much in a larger garment but it’s great for accessories. I also have a green trenchcoat with 3/4 length sleeves that I’ve been hard pressed to find accessories that go with it. This color is perfect and the fitted cuff of these gloves keep my arms warm and toasty during the cold weather.
Cast on 38 sts, leaving a tail 3 yards long
Set up row: sl1, k1, p1, to end, k1
Slip the first stitch of each row for selvedge. This will help keep a neat edge for making up.
Work in 1x1 rib for 9”, ending with a WS row
Change to smaller needles and work in garter stitch for 3”. Remember to slip the first st of each row for selvedge.
Work 1x1 rib for 1”
Bind off, leaving a tail about a foot long
Repeat for second glove
With darning needle sew sides together for 9” of ribbing and 3 of the garter ridges, take yarn off needle
Using the bind off tail and darning needles sew down along 1” of rib and 4 garter ridges
Using the remainder of the long cast on tail, and using size E crochet hook, crochet 15 scs around thumb opening. Repeat 2 more times.
Weave in ends
Wear and enjoy!

Sunday, January 9, 2011
Tomorrow's Pattern
It's supposed to snow this week here in Portland and that leads us to tomorrow's pattern. It'll be a quick knit, in one of my favorite yarns, and is made to keep you warm and fashionable at the same time. Tomorrow's post won't show up until late afternoon, early evening, but bear with me! I'll also have a surprise to tell you all about too....................
Monday, January 3, 2011
Woven
Here's the newest pattern, an entrelac scarf with a little bit of a twist. I was out and about one day and I saw a woman wearing a chunky entrelac scarf with a wide garter border along the sides. It got me thinking about how exactly it worked. I sat down one night with a skein of Noro's Kureyon sock that I got at Twisted here in Portland, http://twistedpdx.com/, and worked out the pattern. The start and finish of the scarf were the trickiest parts, but once you I got going I found it fairly easy. It's best to have a working knowledge of entrelac for this scarf, or a good tutorial like this one from Knitting Daily on youtube.com: http://www.youtube.com/watch?v=tcLxMt9GehM. I love the woven look of entrelac and how well it works with self striping yarns. I also love the wrong side of the work, with it's undulating look, almost more than I like the right side.
Let me know if there are any questions on this one, or if I can make the pattern clearer. I write the patterns the way that makes the most sense to me but I'm never sure if they work for everyone. Any feedback is appreciated! I hope you enjoy making this as much as I enjoyed coming up with it!
As usual all the patterns here are my own design. Please feel free to use them to make yourself a garment but please be sure to reference me as the designer. Thank you and enjoy!
Woven
1 skein Noro Kureyon Sock color 226
Size 6 needles
This is a fairly tricky pattern so it is best if you are familiar with Entrelac and short rows before beginning the scarf.
garter stitch: knit every row
pm: place marker
sm: slip marker
sl2: slip 2 sts as to purl
sl1: slip 1 st as to purl
ssk: slip 2 sts as to purl, place them back on the left hand needle and knit them together
p2tog: purl 2 sts together
w&t: slip st, turn work so opposite side is facing you, bring yarn from back of work between needles and AROUND the slipped st, wrapping it. Bring yarn back to the opposite side of work.

Scarf measures about 50" long
Gauge is not necessary, but I got 5 sts to 1”
I was out and about one day when I saw a woman wearing an entrelac scarf. It had a border of garter stitch along the bottoms and sides and that got me wondering exactly how that would work. I pulled some yarn out of my stash and started trying different things. Finally, about 11pm one night I got it and started on the scarf. I love the woven, organic look of the scarf. If you want to you can block the scarf to make it completely even but I left mine unblocked to keep the rustic feel.
Cast on 38 sts
Knit 8 rows in garter stitch
Set up Entrelac Tier
First entrelac block:
knit 5, pm, p1, turn work,
sl1, knit 5, turn work,
knit 5, k1, sl 2, turn work,
p3, sm, k5, turn work,
k5, sm, k2, sl2, turn work,
p4, sm, k5, turn work,
k5, k3, sl 2, turn work,
p5, sm, k5, turn work,
k5, k4, sl2, turn work,
p6, sm, k5, turn work,
k5, sl2, turn work,
p7, sm, k5
Move to next block
Second entrelac block set up row:
(k5, sm, k7, sl2, turn work,
p2, turn work, k1, sl2, turn work,
p3, turn work, k2, sl2, turn work,
p4, turn work, k3, sl2, turn work,
p5, turn work, k4, sl2, turn work,
p6, turn work, k5, sl2, turn work,
p7
Move to next block)
Repeat the Second Entrelac Block set up from ( to ) twice more, pm, end with k5
Second Entrelac Tier:
First block:
k5, sm, pfb, take the la st st just worked and purl it together with the next st, turn work,
k2, sm, k5, turn work,
k5, sm, m1, p1, p2tog, turn work,
k3, sm, k5, turn work,
k5, sm, m1, p2, p2tog, turn work,
p4, sm, k5, turn work,
k5, sm, m1, p3, p2tog, turn work,
k5, sm, k5, turn work,
k5, m1, p4, p2tog, turn work,
k6, sm, k5, turn work,
k5, sm, m1, p5, p2tog
Second block:
(starting with the WS of work facing, and beginning at top of triangle, pick up 7 sts
purlwise along long side of triangle purling LAST picked up st together with the first st
from the next triangle, turn work,
k7, turn work,
p6, p2tog, turn work,
k7, turn work, p6, p2tog, turn work,
k7, turn work, p6. p2tog, turn work,
k7, turn work, p6, p2tog, turn work,
k7, turn work, p6, p2tog, turn work,
k7, turn work, p6, p2tog)
Repeat the Second block from (to) twice more

Wrong side of work
Third Entrelac tier:
First block:
k5, sm, m1, ssk, turn work,
p2, sm, turn work,
k5, sm, m1, k1, ssk, turn work,
p3, sm, k5, turn work,
k5, sm, m1, k2, ssk, turn work,
p4, sm, k5, turn work,
k5, sm, m1, k3, ssk, turn work,
p5, sm, k5, turn work,
k5, sm, m1, k4, ssk, turn work,
p6, sm, k5, turn work,
k5, sm, m1, k6, ssk
Second block:
(pick up 7 sts along long side of next triangle, working the last picked up st and the next
st as a ssk, turn work,
purl 7, turn work, k6, ssk, turn work,
p7, turn work,
k6, ssk, turn work,
p7, turn work,
k6, ssk, turn work,
p7, turn work,
k6, ssk, turn work,
p7, turn work,
k6, ssk, turn work,
p7, turn work,
k6, ssk)
Repeat Second block from (to) twice more
Repeat Second and Third tiers until piece measures 48” from cast on, ending with a WS row

Final tier:
First block:
k5, sm, k7, pick up 7 sts along side of triangle, ssk, turn work
p6, w&t
k5, ssk, turn work,
p5, w&t,
k4, ssk, turn work,
p4, w&t
k3, ssk, turn work
p3, w&t
k2, ssk, turn work
p2, w&t
k1, ssk, turn work,
p1, w&t,
ssk
Repeat this block twice more
Next row: knit, ignoring wraps. These will be disguised by the garter stitch so there is no need to work them with their stitches. Remove markers as you come to them.
Knit 7 more rows.
Bind off
Wear and enjoy!

No model today so Mr. Catch stood in.
Saturday, January 1, 2011
Happy New Year
Hope everyone had a happy New Year's eve last night! Wishing you all luck in this year 2011! And I hope you'll all like the pattern I post on Monday. It's tricky one but a lot of fun!
Subscribe to:
Posts (Atom)